If we have back stack like A -> B -> C -> D , and from D we need to open A without recreating its instance then we should use Clear top and single top as flags and root activity's (in our case A is root) launch mode should be singleTop or singleTask in our Android manifest file.
Monday, 25 November 2019

Sunday, 22 September 2019
Android Interface Definition Language (AIDL)
- AIDL used to perform IPC (inter process communication). In simple words, when we want to communicate with service of other application then we may use AIDL
- Que: How AIDL different then ContentProvider?
Ans: Using ContentProvider we can access data of other application and we may query on data. While Using AIDL we can do interaction with background Service of other application.
We are going to show one example of AIDL Server and Client application when client app will get string and one student object from server app for demo purpose you can do any process and send result from server app to client app in realtime. Lets start with server application first.
- SERVER APP:
Consider that our app's applicationId (package name) is "com.example.aidl.server".
AIDL is nothing but the interface through client app will get callback from server app.
So Basically in server app we have a Service and a AIDL file (interface).
We need to create interface into main>aidl path of the main (app) module.
Into aidl folder create same package name as our applicationId, and add following aidl file.
Now create following one service at your desired package.
Now you have to rebuild app before move further as android will create abstract class of binder object from aidl file. As you see above in service we have implemented object from MyAidl.Stub. and onBind method of service will return this AIDL.Stub instance (which is actually binder). so Client app will bind this service and get instance of Aidl stub. using this client app can call getStudentObject and getString methods. We can pass custom class using parcelable implementation. We need to create one aidl file too for parcelable class. Following is an example of that.
That's it for server app. - CLIENT APP:
Consider out client app's applicationId (package name) is "com.example.aidl.client".
First of all we need same aidl files as server have so we simply copy paste those files.
Here is one thing need to consider "MyAidl.aidl" file should be in package name same as server. We need "Student.aidl" and "Student.kt" both files same as server. you can place "Student.kt" file at your desired package name and in aidl folder we have to put "Student.aidl" file in same package name as we put "Student.kt" file in our client app. Now we have to rebuild app to move further so android studio will generate Stub classes. We can bind server's service and we can get string and student object from it following way.
Using above activity we have bind service and get data from other app.
That's it for client app.
You can find both app at this github url: https://github.com/k9428/Aidl_demo
So this way we can do interprocess communication using AIDL.
Tuesday, 17 September 2019
How to force open english keyboard
- We generally required to open english keyboard by default in password fields. Consider scenario where phone language and app language both are set to other then english. (For ex. set to arabic), Still if we want to open english keyboard for password field then we can use
"android:imeOptions="flagForceAscii" attribute in password field.
Following is full example of edit text.
Friday, 13 September 2019
How to use content provider in android
When to use content provider:
- When we want to
share our data, files etc to other application then we can use content provider.
Following diagram illustrate basic of it.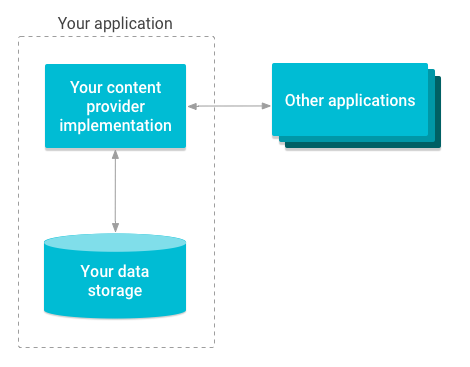
- Let's consider
content provider app as server app and the app who use it called client app.
So to use server app's data, client app needs to use ContentResolver class to perform query to the server app. server app will return cursor to client app so client can iterate through it and read data from cursor. Following diagram illustrate it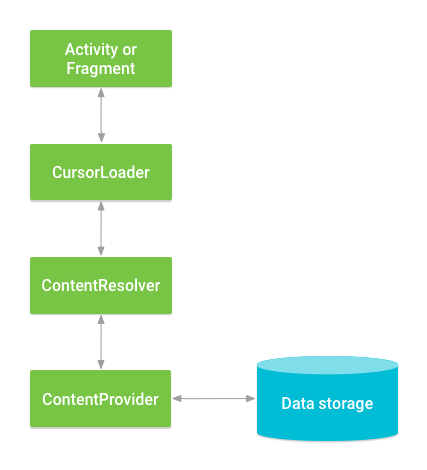
-
Lets start server
side (ContentProvider related) Example.
Consider following package and files structure in server app already there so that we can only focus on content provider. It mainly having Database related files using Room library. Following is structure with use of each file- content_provider_demo (package)
- dao (package)
- RecentSearchDao : Dao class to perform query on recent search table
- ContentProviderDemoActivity: demo activity to get result from content provider and print in logs.
- Database: Singleton class to create RoomDatabase object if not exist
- Detail : contains static variables. i.e. Db name etc
- RecentSearch: Table of recent search, made using Room lib
- RecentSearchProvider: Our provider class. we will discuss about it in next section
- ScoscheDatabase: Room database config class contains all Dao and Entity.
- We are going to
provide access of our "Recent search" data to other app using "RecentSearchProvider" class. To do
that first we have to create "RecentSearchProvider" class as following. I have just use insert and
query method for demo purpose. you can use other methods like update, delete etc
How it works
:
- User can use this content provider using content resolver. in content resolver we need to pass
unique URI so that system can find which provider need to use and what table and data need to
access.
- We can construct Uri like following.
Uri = host://authority/table
Here, host is fixed string "content://".
authority is any unique string which we need to define. We can construct it like following.
- By URI passed in ContentResolver system can find our class and the method (query, insert etc) need to be call. Now user can do different select queries. For ex user can select all recent searches or user might need recent search for given id etc etc. so that we have created URI matcher here, So to get all recent search user need to use this content URI "content://$PROVIDER_NAME/$tblRecentSearch". To get recent search for ID = 4 user may use this type of provider "content://$PROVIDER_NAME/$tblRecentSearch/4".authority = package_name + "."+ your provider class name
-
We have to register this content provider class in AndroidMenifest.xml file to allow its access to apps. We can do it by adding following code in "application" tab.
Here, "name" contains path of our Content provider class and "authority" contains the authority of this provider.
- So server side (or ContentProvider related) logic done here.
- Client side (ContentResolver related) part start here.
Second part is "How to access data from ContentProvider".
We need to create ContentResolver object to access data from ContentProvider. Android have
getContentResolver() (contentResolver property for Kotlin) method to create object of
ContentResolver. ContentResolver have different methods like "insert","query","update",
"delete" etc to access data. We need to use ContentUri defined previously in content provider
to access its data. To insert data to recent search we can do like following.
- To get records from content provider we can use "query" method of contentResolver. It will return cursor
object so we can iterate through it to fetch data. Following example fetch all recent searches.
- That's it for contentResolver. Second part of code can be found in "ContentProviderDemoActivity".
Client side (ContentResolver related) ends here.
- You can find whole demo in Github. Github Link: https://github.com/k9428/Content-Provider-Demo
Tuesday, 27 August 2019
android auto resize textview font not increasing after decrease
I have faced following issue when using textview with autoresize
Following is my layout xml to do auto size
Above code is working fine and did auto complete resize.
but For ex,
if I set value 100
then after some calculation or button click I want to change value to 10000 then text size is too small even if we have space to show this big value.
To solve above problem need to do following.
Following is my layout xml to do auto size
<androidx.appcompat.widget.AppCompatTextView
android:id="@+id/tvAmount"
android:layout_width="match_parent"
android:layout_height="match_parent"
android:scrollHorizontally="true"
android:maxWidth="@dimen/_290sdp"
android:maxHeight="@dimen/_50sdp"
android:gravity="start|bottom"
android:textSize="@dimen/_28ssp"
android:maxLines="1"
android:textColor="@color/charcoal"
android:includeFontPadding="false"
android:layout_toStartOf="@+id/tvCurrency"
tools:text="200"
app:autoSizeTextType="uniform"
app:autoSizeMinTextSize="@dimen/_5ssp"
app:autoSizeMaxTextSize="@dimen/_25ssp"
app:autoSizeStepGranularity="1sp"
app:layout_constraintTop_toTopOf="parent"
app:layout_constraintBottom_toBottomOf="parent"
app:layout_constraintEnd_toStartOf="@+id/tvCurrency" />
Above code is working fine and did auto complete resize.
but For ex,
if I set value 100
then after some calculation or button click I want to change value to 10000 then text size is too small even if we have space to show this big value.
To solve above problem need to do following.
tvAmount.setHorizontallyScrolling(true)
tvAmount.text = value?.getDecimalFormat()
tvAmount.setHorizontallyScrolling(false)
I have to enable and disable horizontal scrolling because internally for autosize text calculation, if horizontal scrolling is true text view's available drawing width is "1024 * 1024" and after setting text, we should disable horizontal scroll so text
size may decrease if required.
Wednesday, 20 December 2017
Android click on push notification create new activity instead of resume same activity from background
To solve this issue you need to change android:launchMode="singleTop" in AndroidMenifest.xml file for that activity.
Android Webview loaddata not changing content second time
Android Webview's loaddata method have issue.
use following way to load data to webview
use following way to load data to webview
webView.loadDataWithBaseURL(null, htmlContent, null, "utf-8", null);
Thursday, 26 October 2017
Android web view set wrap_content height
Use following code to set android web view set wrap_content height
- webview's parent should have match parent height
- and set webview as wrap_content height
---Layout file ---
---java file code---
Following is IMP part
<ScrollView
        android:layout_width="match_parent"
        android:layout_height="wrap_content">

        <LinearLayout
            android:layout_width="match_parent"
            android:layout_height="match_parent"
            android:orientation="vertical"
            android:padding="10dp">

            <ImageView
                android:layout_width="wrap_content"
                android:layout_height="wrap_content"
                android:layout_gravity="center_horizontal"
                android:layout_margin="@dimen/twenty"
                android:src="@drawable/img_sc2_logo" />

            <WebView
                android:id="@+id/wvInfo"
                android:layout_width="match_parent"
                android:layout_height="wrap_content">
            </WebView>
       </LinearLayout>
</ScrollView>
---java file code---
Following is IMP part
binding.wvInfo.loadUrl(ApiRequestUtil.PAGE_APP_WELCOME);
        binding.wvInfo.getSettings().setLoadWithOverviewMode(true);
        binding.wvInfo.getSettings().setUseWideViewPort(true);
        binding.wvInfo.getSettings().setJavaScriptEnabled(true);
        binding.wvInfo.getSettings().setBuiltInZoomControls(false);

        ViewTreeObserver viewTreeObserver  = binding.wvInfo.getViewTreeObserver();

        viewTreeObserver.addOnPreDrawListener(new ViewTreeObserver.OnPreDrawListener() {
            @Override
            public boolean onPreDraw() {
                int height = binding.wvInfo.getMeasuredHeight();
                if( height != 0 ){
//                    Toast.makeText(getActivity(), "height:"+height,Toast.LENGTH_SHORT).show();
                    binding.wvInfo.getViewTreeObserver().removeOnPreDrawListener(this);
                }
                return false;
            }
        });
Wednesday, 1 March 2017
Android get image from view
To get bitmap from any view use following code.
rootView.setDrawingCacheEnabled(true);
rootView.layout(0, 0, rootView.getWidth(), rootView.getHeight());
rootView.buildDrawingCache();
Bitmap bitmap = Bitmap.createBitmap(rootView.getDrawingCache());
rootView.setDrawingCacheEnabled(false);
Wednesday, 18 January 2017
Android popup menu display causes RecyclerView scroll up
If you using android.support.v7.widget.PopupMenu then you may face this issue. Simple solution is to use android.widget.PopupMenu.
But if you need to show icons in your popupMenu then you have to use android.support.v7.widget.PopupMenu. so you should apply following solution.
But if you need to show icons in your popupMenu then you have to use android.support.v7.widget.PopupMenu. so you should apply following solution.
You can have your AnchorView override
requestRectangleOnScreen() and return false. This will prevent any parent ScrollView or RecyclerView from scrolling.
So, For ex If I have anchor view as ImageView then code should be like following.
public class MenuImageView extends ImageView {
    public MenuImageView(Context context) {
        super(context);
    }

    public MenuImageView(Context context, AttributeSet attrs) {
        super(context, attrs);
    }

    public MenuImageView(Context context, AttributeSet attrs, int defStyleAttr) {
        super(context, attrs, defStyleAttr);
    }

    @TargetApi(Build.VERSION_CODES.LOLLIPOP)
    public MenuImageView(Context context, AttributeSet attrs, int defStyleAttr, int defStyleRes) {
        super(context, attrs, defStyleAttr, defStyleRes);
    }

// THIS IS IMP METHOD (RETURN FALSE). ADD IT SO YOUR RECYCLER VIEW WILL NOT SCROLL WHEN YOU CLICK ON MENU.
    @Override
    public boolean requestRectangleOnScreen(Rect rectangle, boolean immediate) {
        return false;
    }
}
Wednesday, 14 December 2016
file:// scheme is now not allowed to be attached with Intent on targetSdkVersion 24
Android Nougat is almost be publicly released. And as an Android developer, we need to prepare ourself to adjust targetSdkVersion to the latest one, 24, to let everything works perfectly on the newest release of Android.
And as always, everytime we adjust targetSdkVersion, we need to check and make sure that every single part of our code works perfectly fine. If you just simply change the number, I could say that your application is taking a high risk of crashing or malfunction. In this case, when you change your app's targetSdkVersion to 24, we need to check that every single function works flawlessly on Android Nougat (24).
And this is one of the checklist you need to mark done before releasing your new version. There is one big security change on Android N like quoted below:
Passing file:// URIs outside the package domain may leave the receiver with an unaccessible path. Therefore, attempts to pass a file:// URI trigger a FileUriExposedException. The recommended way to share the content of a private file is using the FileProvider.
Summarily, file:// is not allowed to attach with Intent anymore or it will throw FileUriExposedException which may cause your app crash immediately called.
Real example with a crashing problem
You may be curious which situation that can really cause the problem. So to make it be easy to you all, let me show you a real usage example that causes crashing. The easiest example is the way we take a photo through Intent with ACTION_IMAGE_CAPTURE type. Previously we just pass the target file path with file:// format as an Intent extra (MediaStore.EXTRA_OUTPUT) which works fine on Android Pre-N but will just simply crash on Android N and above.
You may be curious which situation that can really cause the problem. So to make it be easy to you all, let me show you a real usage example that causes crashing. The easiest example is the way we take a photo through Intent with ACTION_IMAGE_CAPTURE type. Previously we just pass the target file path with file:// format as an Intent extra (MediaStore.EXTRA_OUTPUT) which works fine on Android Pre-N but will just simply crash on Android N and above.
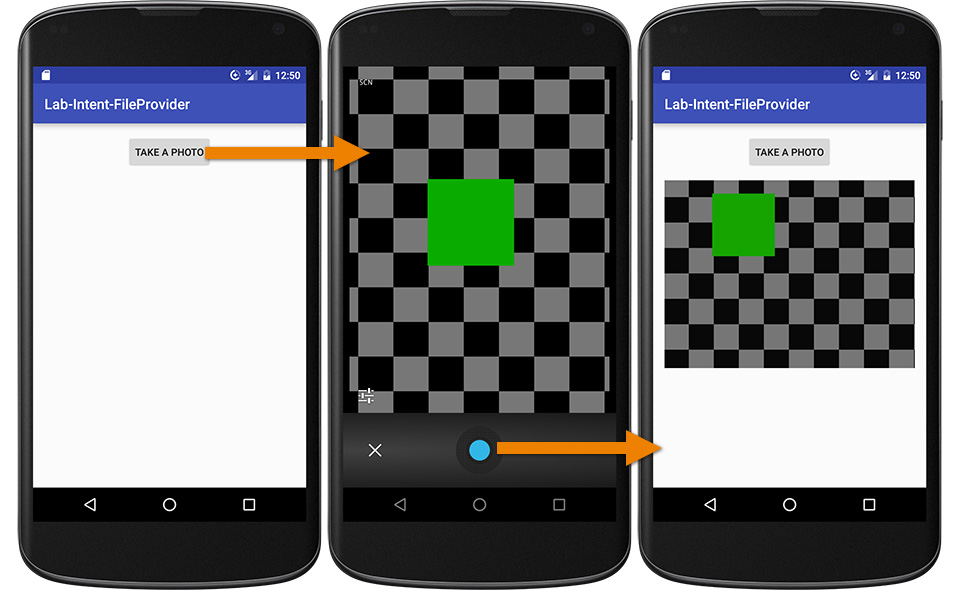
Why Nougat does not allow passing file:// with Intent anymore?
You may be curious why Android team decide to change this behavior. Actually there is a good reason behind.
If file path is sent to the target application (Camera app in this case), file will be fully accessed through the Camera app's process not the sender one.
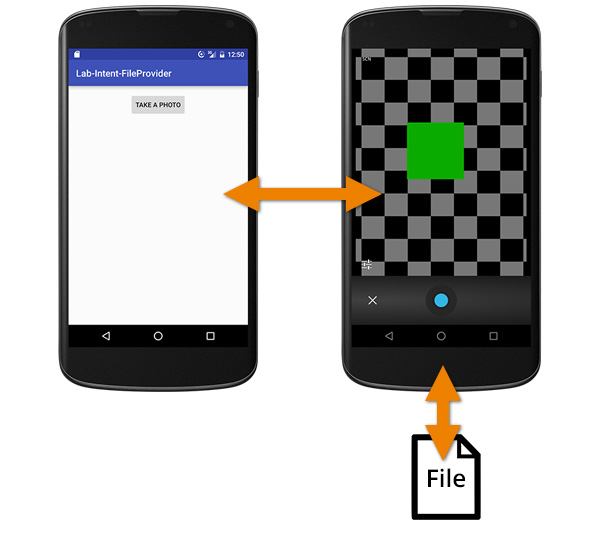
But let's consider thoroughly, actually Camera is launched by our application to take a photo and save as a file on our app's behalf. So the access right to that file should be our app's not Camera's. Every operation did with the file should be done through our application not by Camera app itself.
And that's why file:// is now prohibited on targetSdkVersion 24 to force every developer to do this task in the proper way.
Solution
So if file:// is not allowed anymore, which approach should we go for? The answer is we should send the URI through content:// scheme instead which is the URI scheme for Content Provider. In this case, we would like to share an access to a file through our app so FileProvider is needed to be implemented. Flow is now changed like below:
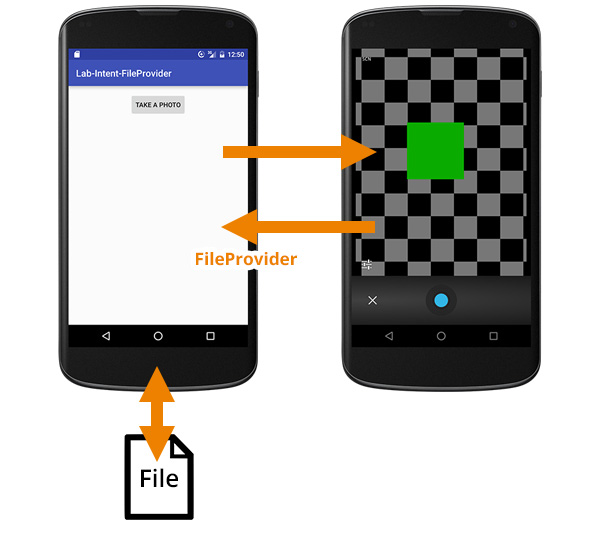
file operation would be done through our app process like it supposes to be !
It is quite easy to implement FileProvider on your application. First you need to add a FileProvider <provider> tag in AndroidManifest.xml under <application> tag like below:
AndroidManifest.xml
<?xml version="1.0" encoding="utf-8"?><manifest xmlns:android="http://schemas.android.com/apk/res/android"
...
<application
...
<provider
android:name="android.support.v4.content.FileProvider"
android:authorities="${applicationId}.provider"
android:exported="false"
android:grantUriPermissions="true">
<meta-data
android:name="android.support.FILE_PROVIDER_PATHS"
android:resource="@xml/provider_paths"/>
</provider>
</application></manifest>
And then create a provider_paths.xml file in xml folder under res folder. Folder may be needed to create if it doesn't exist.
The content of the file is shown below. It describes that we would like to share access to the External Storage at root folder (path=".") with the name external_files.
res/xml/provider_paths.xml
<?xml version="1.0" encoding="utf-8"?><paths xmlns:android="http://schemas.android.com/apk/res/android">
<external-path name="external_files" path="."/></paths>
Done! FileProvider is now declared and be ready to use.
The final step is to change the line of code below in MainActivity.java
Uri photoURI = Uri.fromFile(createImageFile());
to
Uri photoURI = FileProvider.getUriForFile(MainActivity.this,
BuildConfig.APPLICATION_ID + ".provider",
createImageFile());
And .... done ! Your application should now work perfectly fine on any Android version including Android Nougat. Yah !
Ref links: https://inthecheesefactory.com/blog/how-to-share-access-to-file-with-fileprovider-on-android-nougat/en
Wednesday, 20 April 2016
Android pdf viewer
Following link have very good implementation of MU PDF android library
https://github.com/tekinarslan/AndroidPdfViewer
https://github.com/tekinarslan/AndroidPdfViewer
Tuesday, 12 April 2016
Git Rebase example
Following tutorial will show how to do git rebase.
This tutorial explain what is rebase first and then it will give demo steps of rebasing.
Explanation of rebase
Reference : https://www.atlassian.com/git/tutorials/rewriting-history/git-rebase


----------------------------------------------------------------------
Demo
Our purpose of demo
Lets say we have following branches.
master:
at first launch master branch have base setup of our project.
module1:
suppose developer 1 worked on module 1. and merge it with master. so master have base setup and module1
module2:
suppose developer 2 worked on module 2. and merge it with master. so master have base setup and module1 and module2
As a result when both developer complete work on module 1 and module 2 we want master branch have both module and module1 and module2 have it's change seperatly.
------------------------------
Steps to achieve it
Lets init git. in Windows open git-bash or in Linux open terminal
1 : cd <your demo folder path>
2 : git init : it will init git in above given folder
3 : In master branch : let's create file named "base-setup.txt" and commit it by these commands. git add -A, git commit -m "base setup in master"
4 : Checkout new branch module1 and add some module 1 file or modify required file and commit changes of module1 branch. we may need following commands.
git checkout -B module1.
after this do your work.
when work completed then use following commands to commit changes in module1 branch.
git add -A and git commit -m "module1 completed" commands
5 : Lets merge module 1 with master.
git checkout master
git rebase module1.
now if there is conflict then open that file in editor and resolve conflict manually. and run git add -A to resolve that conflict.
After resolve conflict run "git rebase --continue"
Now you can check that master have its own files as well as module1's file.
6 : Now follow step 4 and 5 for module2 branch.
7 : After these you can see master have module1 and module2 changes. module1 have only its files. module2 also have only its file.
Conculation : We can use rebase for module management. We can also use this for version management i.e. version 1 have some feature, version 2 have some other feature while master have all feature.
This tutorial explain what is rebase first and then it will give demo steps of rebasing.
Explanation of rebase
Reference : https://www.atlassian.com/git/tutorials/rewriting-history/git-rebase
git rebase
Rebasing is the process of moving a branch to a new base commit. The general process can be visualized as the following:
From a content perspective, rebasing really is just moving a branch from one commit to another. But internally, Git accomplishes this by creating new commits and applying them to the specified base—it’s literally rewriting your project history. It’s very important to understand that, even though the branch looks the same, it’s composed of entirely new commits.
Usage
git rebase <base>
Rebase the current branch onto <base>, which can be any kind of commit reference (an ID, a branch name, a tag, or a relative reference to
HEAD).Discussion
The primary reason for rebasing is to maintain a linear project history. For example, consider a situation where the master branch has progressed since you started working on a feature:
You have two options for integrating your feature into the
masterbranch: merging directly or rebasing and then merging. The former option results in a 3-way merge and a merge commit, while the latter results in a fast-forward merge and a perfectly linear history. The following diagram demonstrates how rebasing onto master facilitates a fast-forward merge.
Rebasing is a common way to integrate upstream changes into your local repository. Pulling in upstream changes with
git merge results in a superfluous merge commit every time you want to see how the project has progressed. On the other hand, rebasing is like saying, “I want to base my changes on what everybody has already done.”Don’t Rebase Public History
As we’ve discussed with
git commit --amend and git reset, you should never rebase commits that have been pushed to a public repository. The rebase would replace the old commits with new ones, and it would look like that part of your project history abruptly vanished.Examples
The example below combines git rebase with git merge to maintain a linear project history. This is a quick and easy way to ensure that your merges will be fast-forwarded.
# Start a new feature
git checkout -b new-feature master
# Edit files
git commit -a -m "Start developing a feature"
In the middle of our feature, we realize there’s a security hole in our project
# Create a hotfix branch based off of master
git checkout -b hotfix master
# Edit files
git commit -a -m "Fix security hole"
# Merge back into master
git checkout master
git merge hotfix
git branch -d hotfix
After merging the hotfix into master, we have a forked project history. Instead of a plain git merge, we’ll integrate the feature branch with a rebase to maintain a linear history:
git checkout new-feature
git rebase master
This moves new-feature to the tip of master, which lets us do a standard fast-forward merge from master:
git checkout master
git merge new-feature----------------------------------------------------------------------
Demo
Our purpose of demo
Lets say we have following branches.
master:
at first launch master branch have base setup of our project.
module1:
suppose developer 1 worked on module 1. and merge it with master. so master have base setup and module1
module2:
suppose developer 2 worked on module 2. and merge it with master. so master have base setup and module1 and module2
As a result when both developer complete work on module 1 and module 2 we want master branch have both module and module1 and module2 have it's change seperatly.
------------------------------
Steps to achieve it
Lets init git. in Windows open git-bash or in Linux open terminal
1 : cd <your demo folder path>
2 : git init : it will init git in above given folder
3 : In master branch : let's create file named "base-setup.txt" and commit it by these commands. git add -A, git commit -m "base setup in master"
4 : Checkout new branch module1 and add some module 1 file or modify required file and commit changes of module1 branch. we may need following commands.
git checkout -B module1.
after this do your work.
when work completed then use following commands to commit changes in module1 branch.
git add -A and git commit -m "module1 completed" commands
5 : Lets merge module 1 with master.
git checkout master
git rebase module1.
now if there is conflict then open that file in editor and resolve conflict manually. and run git add -A to resolve that conflict.
After resolve conflict run "git rebase --continue"
Now you can check that master have its own files as well as module1's file.
6 : Now follow step 4 and 5 for module2 branch.
7 : After these you can see master have module1 and module2 changes. module1 have only its files. module2 also have only its file.
Conculation : We can use rebase for module management. We can also use this for version management i.e. version 1 have some feature, version 2 have some other feature while master have all feature.
Subscribe to:
Posts
(
Atom
)